Thursday, August 1, 2013

DIY NECKLACE HOLDER

As promised yesterday, I'm sharing the second DIY project I came up with using the supplies from the Trade & Made challenge. It's another jewelry organizer, just created in a different way, but wouldn't you know it, it's so similar to what Erin came up with? When she posted her project I laughed to myself because we came up with this whole project together, but never talked about our plans. I guess DIY bloggers sometimes think alike! Read below for the tutorial.


MATERIALS
- square wood plaque
- deco art paint in white and green
- two 1" wooden balls
- one wood dowel
- deco art paint brush
- pink embroidery thread
- drill & drill bit (not shown)


Step 1: Paint the wood plaque white. Let dry. 


Step 2: Paint the wood balls greet and let dry. 


Step 3: With a pencil, mark two spots on the wood plaque for where you want your "hooks" to go. I spaced mine evenly apart and used the wooden balls as a guide. You want to be sure the hooks aren't too close together, but still fit well onto the plaque.


Step 4: Using a drill bit the same size as the dowel, drill about 3/8" into the plaque.


Step 5: Cut two pieces of the dowel to 2 1/4". I cut one piece off each end to ensure I had two smooth ends to work with that were shown. I hid the cut sides into the wood plaque.


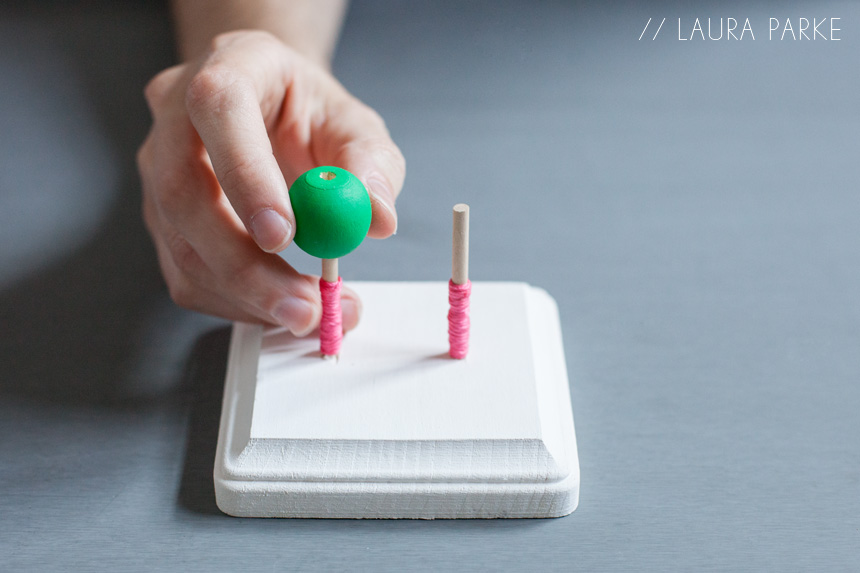
Step 6: Stick the dowels into the plaque. They should fit snuggly. If they don't, reinforce them with some glue suitable for wood. Next, wrap the dowel with the pink embroidery thread, leaving enough space at the end of the dowels for the ball to fit onto.


Step 7: Add the ball on top and voila! (Also paint the end of the dowels the same color as the balls for a more finished look.)


Hang it on a wall, add your necklaces and admire your simple, yet useful organization system.


Wednesday, July 31, 2013

DIY JEWELRY ORGANIZER

Trade & Made reveal day is finally here!! I can't wait to see what everyone came up with! Be sure to visit the parent site where you can find links to every participating blogger. And again, a huge thanks to our sponsors, who without their help and support, we couldn't have done this: Michaels, DecoArt, For the Makers, Clear & Simple Stamps and Specialty Bottle.

I'd also like to thank Erin of House of Earnest. She's been my partner in crime through all of this and a huge help! She gathered lots of supplies, packed all of the boxes, sent them out and I've had so much fun working on Trade & Made with her. What started out as a somewhat offbeat idea last year has become something really fun and exciting.

And now for the reveal! I actually made two projects, both jewelry organizers to hang necklaces. I'll share one today, and one tomorrow.

MATERIALS
- circle wooden plaque
- glass vial 
- metallic gold paint
- paint brush
- embroidery thread (mint shown here)
- 3/4" drill bit (not shown)


Step 1: Paint the plaque with the metallic gold paint and let dry.


Step 2: Find the center point on the plaque and drill about a 1/4" into the plaque. Add touch up paint if desired.


Step 3: Take the glass vial, without the cork lid, and fit it into the drilled hole. If it doesn't fit snuggly, add some glue. I used hot glue and it worked great!


Step 4: To add some color and interest, I wrapped the end of the vial with embroidery thread. I liked doing this because it made it fun and personable. I did this in the same way as I showed here, gluing the end to finish it off.


That's it! Just hang it up and organize your jewelry! I love this solution because you can stack a few necklaces and be set for the week. It also helps detangle necklaces.


So, did you guess what I came up with? What would you have made with the supplies? I'd love to know! And don't forget to come back tomorrow when I'll reveal the second project I made using the Trade & Made supplies!


Wednesday, July 24, 2013

TRADE & MADE

GUYS! I'm back! I know I've taken a long break from blogging and I apologize for not giving you all a heads up. In short, I needed a break to have some time for myself and to explore some more passions and to figure out what really makes me come alive. It's been a healthy time of rejuvenation and slowing down. I've continued to create several projects that I can't wait to share with you all and I've got some new endeavors in the works.

First up is a bigger and better version of Trade & Made with some amazing DIY bloggers! Trade & Made started last year between Erin Souder of House of Earnest and myself where we traded a box of DIY supplies with one another with the challenge to come up with a project using only the contents we received. (See the things we came up with here and here.) The project was so fun and we received such great feedback that we decided to invite DIY enthusiasts to join in on the fun.

The project begins today with bloggers sharing the contents they received and a hint to the projects they are dreaming up. See the complete list of participants and catch up on there plans right here at www.trade-and-made.com.

So what's in the box?


I was so excited to open the box and find such great supplies! A huge thanks to our sponsors: Michaels, Clear & Simple Stamps, For the Makers, Deco Art and Specialty Bottle. This project certainly wouldn't have been possible without your support! And also a loud shout out to Gloria of Little White Whale who designed the most lovely site for us to house this project on. THANK YOU! Some of the items included are paint, brushes, containers (glass, plastic & tin), tags, wooden plaques, a paper mache cone, paper boxes and tags, beads, plastic bags and embroidery floss. Now let the brainstorming begin!

Come back next Wednesday for a full reveal and tutorial on the project I've decided to make using at least four of the items you see here and don't forget to follow along with all of the participants at Trade & Made.

Thursday, February 14, 2013

HAPPY VALENTINE'S DAY!

I love Valentine's Day! Don't you? I made these little Valentine's to hand out to a few friends. Just glued some felt shapes together, added some ribbon and voila!