Wednesday, August 29, 2012

DIY A-FRAME WINE RACK

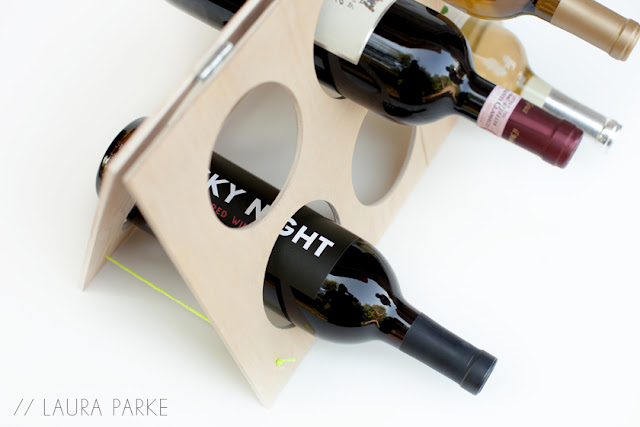
On Monday I shared the first of two DIY projects I created for the DIY Network, and today I'm sharing the full tutorial on the second project...an A-Frame wine rack. This project was a little heavier on the industrial side of things than I normally do, but I really loved the outcome. Continue reading for full instructions.

MATERIALS:
-2 pieces of birch plywood (15 3/8" x 10")
-2 small hinges with screws
-screwdriver
-neon string (1 yard)
-3 1/2"drill bit (these can be pricey, but can be used for multiple projects)
-1/16" drill bit
-150 grit sandpaper (not shown)
-power drill (not shown)


STEP 1: Mark where the center of each circle will go, using a straight edge and a pencil. For reference, the ones shown here are 1 1/2" from the sides and 1" from the top and bottom. Also, each circle edge is 3/4" apart from one another. It might be helpful to use a protractor for this step to ensure the complete circles are spaced how you would like them to appear. Just use a pencil and erase after drilling if needed. *Please note that the drill bit will itself shave off some of the measurement, meaning the drill bit itself takes up some space, so the top margin might be a little less than 1" when finished, etc. This is a DIY project, not a professional piece. 


STEP 2: Using the power drill with the 3 1/2" drill bit attached, drill six holes into each piece of plywood, making a total of 12 holes. 6 on each sheet of wood.


STEP 3: With the 150 grit sand paper, smooth any rough edges created from the drill. 


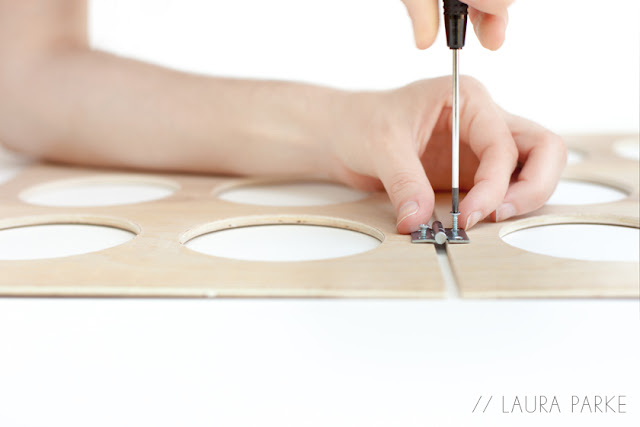
STEP 4: Measure for the hinges. Here, I measured to the center of the hole. Install one side of the hinge. Matching up the second piece of wood, secure the other side of the hinge. 


STEP 5: Set up the wine rack in an "A" frame manner, leaving the opening to about 6" wide. 


STEP 6: Measure 1" in from the side and bottom and mark with a pencil. Using the 1/16" drill bit, drill a hole into each of the four corners that make up the bottom of the wine rack. 


STEP 7: Using the neon string (10-12" should be enough), loop it through one of the holes and tie a double knot to secure it. 


STEP 8: Take the other end of the string and loop it through the opposite hole and tie it in a double knot, making sure the opening is 6" when stretched to it's capacity. Trim the excess string. Do this same step to the other side and you're all finished!


Set your wine rack upright and load it up. 


Tuesday, August 28, 2012

500 DAYS OF BLISS

I don't tend to get very personal on this blog, but what I'm sharing today is part DIY and part personal story, so I figured I'll go with it. Last week I celebrated 500 days being married to my husband, Eric. We don't celebrate every tiny occasion, but I intended to do something thoughtful for our first 100 days, and that came and went so quickly, so the next best was to wait until 500 days. I cut out a little saying, trimmed it into a banner and presented it to Eric with joy & delight.


The amazing thing for me about being married to Eric is that he understands me to the core. He goes along with my celebratory ways as if it's something he's thought of too. It's such a gift to be so supported by your spouse. Sometimes I'll come up with an idea, like making something festive to toss on the top of a stack of pancakes, just on any ordinary day. I'll think about it for a bit, then get a tad sheepish about going through with the idea, but then I remember who I'm married to and I say to myself "Do it. He'll love it!" And he does! Together we are creative, optimistic and curious. Separately he is passionate, driven and minimal where I am a day-dreamer, a collector and one who loves to laugh. I often have my head up in the clouds and he soon follows, spouting off all of the possibilities our lives might hold. Life with him is one blissful, adventurous journey and if the first 500 days are any indication of where life might take us, we are going to be immensely blessed.

Monday, August 27, 2012

DIY PLANTER BOX

Last week I gave you a sneak peak here to a project I recently did for the DIY Network. I had so much fun coming up with this project. It's useful and practical...two things I love in a DIY project. Read on for the full instructions.

Materials:
- 5 pieces of wood (maple shown here) (2 measuring 5 1/2" x 5 1/2" for the ends), (2 measuring 20" x 5 1/2" for the sides) and (1 measuring 18 1/2" x 5 1/2" for the bottom)
-wood glue
-3 small finishing nails
-3 metal clips
-hammer
-2 clamps
-neon spray paint
-extra finishing nails for reinforcement (not shown)
-waterproofing tape (not shown, optional)


STEP 1: Take the piece of wood that will be used for the bottom (measuring 18 1/2" x 5 1/2") and place a small bead of wood glue on all four sides. Lay it on your work surface. 

STEP 2: With one of the side pieces (measuring 20" x 5 1/2"), press it against the bottom, lining it up in the center. This will leave 3/4" overhang on each end. 


STEP 3: Place a small bead of wood glue down the side of one of the end pieces and press it onto the bottom and side piece, creating a corner. Repeat this step on the other end of the planter. 


STEP 4: With the final side pieces, place a small bead of wood glue on it, as well as the end pieces and press it gently to complete the box. While the glue is still a little bit wet, shift your box slightly to ensure the pieces match up how you want them. You will need to work rather quickly through this step before the glue dries.


STEP 5: Once your pieces are in place, use a clamp on each end to secure the box. Let the box dry for at least 12 hours. Once dry, I recommend using a couple of finishing nails on each corner to reinforce the box. (This step is not shown)


STEP 6: Using a pencil, mark where you would like your clips to go. For this box, I measured 1" down from the top opening and put one in the direct center (10" in from the end) and then split the difference for the two other clips on either side. Once you have them marked as desired, gently hammer in a nail, allowing it to poke out a bit for the clip to slide onto.


STEP 7: I spray painted the clips, using neon spray paint suitable for metal. With a couple quick coats and drying time, I was ready to customize the planter box. Using trimmed card stock, I wrote the names of the herbs I was going to plant and marked the spaces accordingly.


* If opting to use waterproofing tape, this is where you would line the inside of the box with it. This step will ensure your box will not warp over time. This step is recommended if you are planting items that require regular watering. 

STEP 8: Grab some potting soil and plant your favorite items in a row! Shown here are rosemary, basil and savory. 


I'm curious, what herbs would you plant to have handy in your kitchen for regular use? Right now, I can't get enough rosemary, especially on those little red potatoes. Yum!


Wednesday, August 22, 2012

DIY: CLOCK


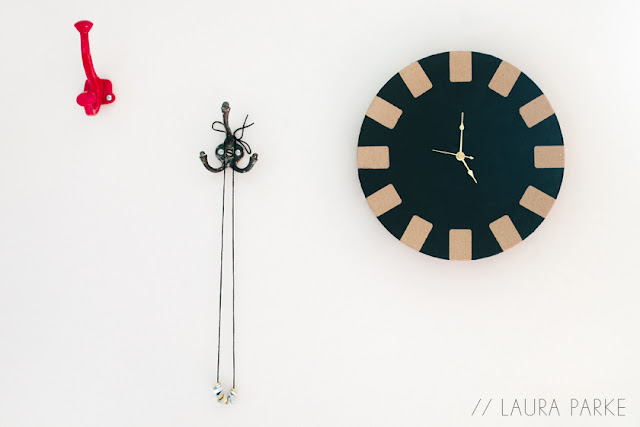
I'm over on Design for Mankind today with this week's MakeKind post. I'm really excited to share this project, because it turned out so so well. I took yet another paper mache box lid to create something new out of it...a wall clock!


I'm curious, what would you make if you had an extra paper mache box lid lying around?

Tuesday, August 21, 2012

DIY: KITCHEN CANISTERS

Today I have something really easy and fun to share. I've teamed up with DecoArt to create a project using their new line of glass paints. I'm armed with every color and type of glass paint I could dream of and you guys are going to love them! They are so easy to use and the project possibilities really are endless. I first used DecoArt paint when I made the Painted Wood Bead Necklace and have used them almost exclusively since. The colors are so accurate and for a designer like me, that's important!

When DecoArt approached me about trying out their new glass paints I was so excited. Honestly, I haven't done many projects involving glass, but I was up for the challenge. After a few too many times of digging through my kitchen pantry for the baking necessities, I decided I was in need of a couple of canisters to hold heavily used items like flour and sugar. I went to Michaels and found the perfect glass canisters, complete with the locking lid and I went to town. 


Read on for the complete project. 

Materials: 
-DecoArt Dimensional Outliner in black
-DecoArt Transparent Stain (I used red)
-2 glass canisters
-small paint brush
-outlined print to trace (I used F for flour and S for sugar)


Step 1: Tape the outline of your image to the inside of the glass jar, making sure it's straight.


Step 2: Using the DecoArt Dimensional Outliner, gently squeeze the tip and outline your shape. Go slow on this step to ensure a straight line. Allow this paint to dry overnight. 


Step 3: Once the Dimensional Outliner is dry, take the DecoArt Transparent Stain to fill in the shape. Gently squeeze the stain on the inside of the shape you made. Start with less than you think, as you can always add more later. Use a small paintbrush to make sure the stain reaches into each corner of your shape. Then allow the jar to dry in a horizontal position overnight. 


Once your piece is dry, follow the baking instructions on the package to make your design more permanent. What do you guys think? Do you like what I made?


To see more products and project ideas from DecoArt, check out their Pinterest page. There is a specific Pinterest board just for their line of glass and enamel paints too! They are also on twitter @DecoArt_Inc and I'm sure they would love for you to say hello!

Monday, August 20, 2012

DIY NETWORK

I have something really exciting to share today. A short while ago, sweet Erin from Design for Mankind asked if I would come up with a few projects for the home that involve neon for the DIY Network. Of course I jumped at the chance to use some bright materials! Thank you, Erin, for allowing me to get involved in these fun projects. Full tutorials will come later on my blog, but for now, head on over to the DIY Network to see for yourself.

First up is a small herb planter box, perfect to keep near a kitchen window for easy access while cooking.


The other project is an A-Frame Wine Rack. It easily tucks away when not in use, but is also compact enough to be displayed constantly.